Using Google Forms to collect information from your students, parents, friends -- and more -- is very very user-friendly and a snap to use.
https://docs.google.com/presentation/d/1f4HDe3dUGr4Ftx4d6EbkFzq_Ei7RjfweVp2DW2QLGmM/edit#slide=id.i0
You will need a google account to create a form ---
Once you are logged onto your account -- you need to navigate to the google drive area and click on NEW
You will need a google account to create a form ---
Once you are logged onto your account -- you need to navigate to the google drive area and click on NEW
CREATING YOUR FORM
You will see this
You will see this
Add the title to your form in the first rectangle --
Add a description in the 2nd area. (it does allow hyperlinks if you need to refer your users to some information.)
Then you come to the question area.
Add a description in the 2nd area. (it does allow hyperlinks if you need to refer your users to some information.)
Then you come to the question area.

- The pencil allows you to edit!
- The double square duplicates the question!
- The trashcan deletes the question!

Look to the question options
Multiple choice allows you to direct to a new page Based on their answer.
Multiple Choice, Checkboxes, Choose From a List -- will display your collected data in a pie chart.
Before you move onto your next question -- choose whether the question you ask is a required question.
Google is always evolving -- so always be prepared for NEW question options!
Before you move onto your next question -- choose whether the question you ask is a required question.
IF the person overlooks a required question, google forms will pop up a window reminding them to complete that question.
Hint ONE: Often sample question 2 gets overlooked......
so double check your form before publishing it.
Hint TWO: You can rearrange your questions by dragging them --
you can add questions to your form AFTER you have shared it out....
HOWEVER, it will NOT rearrange the order of questions on your results form.
Every so often -- save your form as you are working on it.
CHOOSING A THEME
Once you have created your form -- you might with to pretty it up.
Look up to the top and click on THEMES.
Google Forms has over 90 themes for you to use. Unfortunately, at the time this tutorial was created, creating your own theme is not an option.
Click on the theme to view the look. When you find the theme you wish to use, click on APPLY.
Look to the bottom of your form and you will see the URL for your published form. Highlight that to be able to copy/paste onto your website, blog, wiki, etc.
EMBEDDING & CONFIRMATION
Before you share out the link to your FORM, you will want to Edit the Confirmation (what they see AFTER they click submit) -- this does allow URL's if you wish to direct them to another site.
~~HINT: often they will need to scroll UP to see the confirmation -- so you might to add that they "scroll up' in your confirmation.
When you click on EMBED -- it will give you the CODE you will need if you wish to embed the form onto your webpage, blog, wiki......
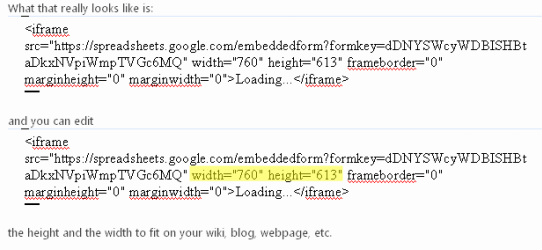
Don't let the code intimidate you....you can edit it so that it fits nicely on your blog, wiki, webpage, etc.
So Now Your Form is ready to go.....
and you can share it with everyone you wish to share data.
VIEWING YOUR DATA
In google docs, click on your form --
and look for Show Summary
and you can share it with everyone you wish to share data.
VIEWING YOUR DATA
In google docs, click on your form --
and look for Show Summary
and your data will not be displayed in a bar or pie graph.
You also can DOWNLOAD your form to use with excel to make mail merges!!!
AND-- you can use google forms with http://mapalist.com/ to create maps from your form information!!
Example:
AND-- you can use google forms with http://mapalist.com/ to create maps from your form information!!
Example:

And one of my favorite.....
collect information in a form and then create a wordle.
collect information in a form and then create a wordle.
© ProjectsByJen.com 1999 - 2015
This work is licensed under a Creative Commons
Attribution- NonCommercial-No
Derivs 3.0 License
This work is licensed under a Creative Commons
Attribution- NonCommercial-No
Derivs 3.0 License
